Activity 1.7: Raylib Lab 1 — The Window

What You're Building
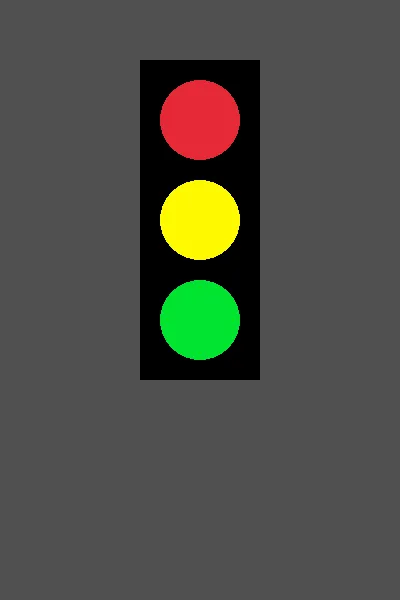
By the end of Task 2 you will have a stoplight, built from four shapes whose numbers put every one of them exactly where it lands.
Task 3 is not shown. The pole and the street sign are yours to work out.
Activity 1.7
Raylib Lab 1 — The Window
Key Concepts
What a Lab Is
The Coordinate System
Drawing Shapes
What Is a Lab?
Every few activities we stop printing text and draw instead.
Labs never introduce new logic.
Today there is no new C# at all. Only a new place to put it.
You Have Run This Before
Activity 1.1 told you to leave all of this alone. Today it stops being scenery.
You Have Run This Before
Raylib.InitWindow(screenWidth, screenHeight, "Stoplight");Raylib.SetTargetFPS(60);
while (!Raylib.WindowShouldClose()){    Raylib.BeginDrawing();    Raylib.ClearBackground(Color.DarkGray);    Raylib.EndDrawing();}
Raylib.CloseWindow();
A window with nothing in it. That is the whole result, and it is correct.
Four Lines Do Everything
InitWindow- Opens a window of a given width, height, and title.
BeginDrawing- Starts a picture.
EndDrawing- Shows it.
CloseWindow- Shuts everything down at the end.
Why Is There a Loop?
A window has to redraw itself constantly, or it goes blank.
Sixty times a second, the whole picture is painted again.
WindowShouldClose becomes true when you click the X.
You did not write this loop and you will not touch it today.
Where Is (0, 0)?
Not where you expect.
Where Is (0, 0)?
(0, 0) (400, 0) +-----------------+ | | | | | | | the window | | | | | | | +-----------------+(0, 600) (400, 600)(0, 0) is the top left, and y gets bigger going down.
In math class y goes up. Here it goes down, and it catches people every time.
Rectangles
x, y, then width, height, then color.
Rectangles
Raylib.DrawRectangle(140, 60, 120, 320, Color.Black);
Its x and y are the top left corner.
Circles
x, y, then a radius, then color.
Circles
Raylib.DrawCircle(200, 120, 40, Color.Red);
Here x and y are the center, not a corner — and the 40 is a radius, so it spans 80 pixels.
Corner Versus Center
A rectangle is placed by its corner. A circle is placed by its middle.
There is no good reason. It is just how it is.
It is the single most common cause of “why is my shape in the wrong place?”
One Number Apart
Three identical circles. Same x, same radius, and only y changes.
One Number Apart
Raylib.DrawCircle(200, 120, 40, Color.Red);Raylib.DrawCircle(200, 220, 40, Color.Yellow);Raylib.DrawCircle(200, 320, 40, Color.Green);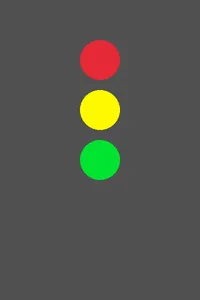
If you can read those three lines, you can read the coordinate system.
Order Decides What You See
Two squares, overlapping. The second one wins.
Order Decides What You See
Raylib.DrawRectangle(100, 100, 150, 150, Color.Red);Raylib.DrawRectangle(160, 160, 150, 150, Color.Blue);
A picture is a stack, built bottom to top, in the order you wrote it.
And It Can Erase Your Work
So what happens if the housing is drawn after the lamps?
And It Can Erase Your Work
Raylib.DrawCircle(200, 120, 40, Color.Red);Raylib.DrawCircle(200, 220, 40, Color.Yellow);Raylib.DrawCircle(200, 320, 40, Color.Green);Raylib.DrawRectangle(140, 60, 120, 320, Color.Black);All three lamps are still being drawn. You just cannot see any of them.
You will do this on purpose in Task 2.
Today's Objectives
- Opening a window and setting a background color
- Locating a point using window coordinates
- Drawing rectangles and circles
- Controlling color and drawing order
Key Terms
- Library
- Code somebody else wrote that your program can use.
- Coordinate
- A pair of numbers, x and y, giving a position in the window.
- Origin
- The point
(0, 0), at the top left corner. - Pixel
- One dot on the screen. Every measurement here is counted in these.
- Radius
- The distance from the center of a circle to its edge.
'F' → Fullscreen
Build
Make your own copy of the game template, named 1-7-stoplight. Never edit a template directly.
Everything you draw today goes between BeginDrawing and EndDrawing. Nothing moves, so nothing needs to change between one frame and the next.
How to read the code blocks. Each task's code block shows your whole program, from line 1, as it should look when that task is finished.
You never start a new file and you never delete your work. The green lines marked with a + are the ones you add or change for that task — everything else is already in your file. Do not type the + sign.
Task 1: An Empty Window
- Delete the template's
DrawTextline and make your file match the code below. - Run it. A plain dark gray window is the whole result, and it is correct.
- Change
Color.DarkGraytoColor.Blackand run again. ChangescreenHeightto 300 and run again. Then set both back.
#:package Raylib-cs@8.0.0
using Raylib_cs;
int screenWidth = 400;int screenHeight = 600;
Raylib.InitWindow(screenWidth, screenHeight, "Stoplight");Raylib.SetTargetFPS(60);
while (!Raylib.WindowShouldClose()){ Raylib.BeginDrawing(); Raylib.ClearBackground(Color.DarkGray); Raylib.EndDrawing();}
Raylib.CloseWindow();Task 2: The Housing and Three Lamps
- Before you type anything, predict where each shape will land. Sketch the window on paper if it helps.
- Then add the four lines and run it.
- Check your prediction against the result. The rectangle and the circles use their numbers differently, and you should be able to see that.
- Note: the green lines marked with a + sign are new. Do not type the + sign.
#:package Raylib-cs@8.0.0
using Raylib_cs;
int screenWidth = 400;int screenHeight = 600;
Raylib.InitWindow(screenWidth, screenHeight, "Stoplight");Raylib.SetTargetFPS(60);
while (!Raylib.WindowShouldClose()){ Raylib.BeginDrawing(); Raylib.ClearBackground(Color.DarkGray);
Raylib.DrawRectangle(140, 60, 120, 320, Color.Black); Raylib.DrawCircle(200, 120, 40, Color.Red); Raylib.DrawCircle(200, 220, 40, Color.Yellow); Raylib.DrawCircle(200, 320, 40, Color.Green);
Raylib.EndDrawing();}
Raylib.CloseWindow();The housing has to be drawn first. Move it below the three circles and run it again to see why, then put it back.
Task 3: Plan, Then Add the Pole
- The comments are a plan, and they belong inside the drawing block you already have, after the three lamps. Write your drawing code under them.
- Everything must sit below the housing, which ends at y = 380. Every y you use should be larger than that.
- The sign board is a rectangle and the street name is
DrawText. Watch your order — if the name vanishes, you drew the board on top of it. DrawTexttakes x, y, a size, and a color, and its x and y are its top left corner.
#:package Raylib-cs@8.0.0
using Raylib_cs;
int screenWidth = 400;int screenHeight = 600;
Raylib.InitWindow(screenWidth, screenHeight, "Stoplight");Raylib.SetTargetFPS(60);
while (!Raylib.WindowShouldClose()){ Raylib.BeginDrawing(); Raylib.ClearBackground(Color.DarkGray);
Raylib.DrawRectangle(140, 60, 120, 320, Color.Black); Raylib.DrawCircle(200, 120, 40, Color.Red); Raylib.DrawCircle(200, 220, 40, Color.Yellow); Raylib.DrawCircle(200, 320, 40, Color.Green);
// Add a pole and a street sign below the light: // a narrow gray rectangle running down from the housing // a wider sign board below the pole // the street name, drawn on top of the sign
Raylib.EndDrawing();}
Raylib.CloseWindow();Challenge (Optional): A Fourth Lamp
- Add a fourth lamp below the green one, evenly spaced with the rest, and make the housing taller so it fits.
- Work out every number by hand. Count how many you had to change to move one lamp.
- Remember that number. Lab 2 is about getting rid of it.
Checkpoint
- Your window is 400 by 600 with a dark gray background.
- Three lamps sit inside the housing, none of them overlapping it.
- The pole and the sign are entirely below y = 380.
- The street name is readable, which means it was drawn after the board.
- You can point at any number in your program and say what it does.
Reflection
Answer the following questions before submitting your work.
- The three lamps differ in exactly one number. Which one, and what would happen to the picture if you made all three the same?
- A rectangle is placed by its corner and a circle by its center. Describe a mistake that difference would cause, and how you would recognize it on screen.
- You did not write the
whileloop and did not change it. What do you think would happen if you deleted it and left only the drawing lines?
Submit
Submit three things to the dropbox:
- Your 1-7-stoplight program file.
- A screenshot of your finished window.
- Your three reflection answers.